Documentation
Cachify is the mature, free caching plugin for WordPress, which increases blog performance and reduces database queries.
With an increasing number of dynamic widgets, templates and plugins, a WordPress blog tends to become sluggish. With the load of the visitors ramp accumulates the accesses to the database, the server has to deal with the processing of flexible areas proportionally more. A delay in delivery of the web pages is the result of the load. Cachify has been developed especially for small to medium sized projects: smart, clear cache plugin, which temporarily stores page contents in a static form and delivers performance-gently. A benefit for the reader and the ranking. Available storage methods: database, disk, Memcached and Redis.
Installation
Cachify can be downloaded from the official WordPress-Plugin-Page: Download
Alternatively, the installation can be done directly in WordPress in the “Plugins” administration area → “Adding plugins”: Search for Cachify, select, install.
After the successful activation of the plugin, available Cachify Settings can be defined. In the delivery state, Cachify has predefined options so that the operations are automatically started.
Functionality
Indeed Cachify does not offer the functionality of some industry-specific plug-ins. However the caching plugin does the job perfectly and very reliably. And this with very minimal resources and manageable code. This makes it clear and fast.
So what does Cachify do? If a visitor visits a blog page, the cache plugin checks if this page is already in the cache as a static source code. In the positive case the cached version of the page comes to output. Otherwise, the smart cache solution feeds the current page content to the cache which is depending on the setting located in the WordPress database, the server hard disk or the server memory via the APC module. The next time the page is hitted by a Browser, it would be read from the cache and sent directly to the browser.
The advantage of the technology is quickly clear: Contents are available in static form for output and are not first brought together into output form by countless database accesses and dynamic PHP scripts.
In addition, the loading time of the blog pages also benefits because webpages are delivered directly from the server. In the test lab, Cachify was able to reduce the database queries by 80 percent and the execution time by up to 60 percent. Summa Summarum: The database and the server are noticeably relieved.
<!DOCTYPE html> <html lang="en-US"> <!-- ... --> </html>

<!-- Cachify | http://cachify.de
Generated @ 23.05.2020 18:10:11 -->Code language: HTML, XML (xml)
Cachify in use: Plugin output in the source code
Cache reset: Automatic and manual
Cachify empties the entire cache after newly created or modified posts because after the article has been published too many changes or shifts are expected within the archive pages. More efficient management would increase the complexity of the cache solution. Exception: Changes to comments cause a rebuild of the cache exclusively for the affected blog page.
Also in favor of clarity and simplicity of the code, rarely executed element actions such as newly created categories and tags do not encounter a cache refresh. If necessary press the Cachify button Flush the cachify cache (Trash icon) in the admin bar – the saved cache will be eliminated and the data will be re-indexed. If the Plugin is Multisite-enabled it will empty the cache of all Multisite blogs.
The “Flush the cachify cache” button can be controlled by the plugin’s own filter cachify_user_can_flush_cache. In the delivery state, all WordPress users with the role Administrator are shown the button and can use it to empty the cache inventory.

Automatic clearing of the cache
- After publishing new posts
- After publishing new pages
- After publishing new custom post types
- After publishing new sheduled posts (only Cachify DB)
- After updating WordPress
- If you confirm the trash button on the adminbar
- After saving Cachify settings
– Internal Exception List (Areas that are excluded from the cache)
- Password protected pages
- Feeds
- Trackbacks
- Robots
- Previews
- Mobile-themes (WP-Touch, Carrington, Jetpack Mobile)
- Search
- Error pages
- Sitemaps
Conclusion
The dimension of the blogs that use this caching plugin is secondary: the goal is always to reduce the database queries and PHP executions to relieve the server and to boost speed until the page is displayed. As a rule of thumb, the less dynamism and flexibility, the more clever the cache, the faster the web pages.
Caching Methods
Cachify can manage the web page cache using 4 different cache techniques: database, APC, memcached (nginx only) and hard disk. In the following, necessary adjustments to server system files are described in detail.
Database
No system file extension required.
The cached markup is stored directly inside the WordPress database. This still speeds up page load times, because the content does not need to be generated dynamically, but the previously generated HTML markup is directly loaded.
Hard disk (HDD Cache)
If the hard disk is selected as the location for the cache Cachify stores the generated HTML code of the requested blog pages on the HDD of the web server – one HTML file per web page. The server will make the redirections to the appropriate cache file. The startup of the PHP interpreter is completely eliminated und this provides an additional boost of performance.
Before the option is selected in the Cachify settings, a new folder called cache with 777 as rights should be created in the WordPress directory wp-content (later also more restrictive if the functionality of the plugin is not affected). If this path already exists the permissions are only to check. The plugin will try to create the folder itself, but in the event of an error the script would end with a hint. For this reason prefer to prevent this.
The Apache or Nginx web server controls the negotiation between the page call the browser made and the existing cache file. Correspondingly, this task is delegated to the server. This can be done by extending the Apache file .htaccess or the Nginx configuration file. Examples of implementations follow below.
In addition to a HTML version of the web pages, Cachify creates a GZIP compressed version. The server accesses the compressed file and will not make its own time-consuming compression of the content. This saves CPU load because files are already compressed (before).
Example .htaccess extension:
# BEGIN CACHIFY
<IfModule mod_rewrite.c>
  RewriteEngine on

  # set hostname directory
  RewriteCond %{HTTPS} on
  RewriteRule .* - [E=CACHIFY_HOST:https-%{HTTP_HOST}]
  RewriteCond %{HTTPS} off
  RewriteRule .* - [E=CACHIFY_HOST:%{HTTP_HOST}]

  # set subdirectory
  RewriteCond %{REQUEST_URI} /$
  RewriteRule .* - [E=CACHIFY_DIR:%{REQUEST_URI}]
  RewriteCond %{REQUEST_URI} ^$
  RewriteRule .* - [E=CACHIFY_DIR:/]

  # gzip
  RewriteRule .* - [E=CACHIFY_SUFFIX:]
  <IfModule mod_mime.c>
    RewriteCond %{HTTP:Accept-Encoding} gzip
    RewriteRule .* - [E=CACHIFY_SUFFIX:.gz]
    AddType text/html .gz
    AddEncoding gzip .gz
  </IfModule>

  # Main Rules
  RewriteCond %{HTTP_ACCEPT} .*text/html.*
  RewriteCond %{REQUEST_METHOD} GET
  RewriteCond %{QUERY_STRING} ^$
  RewriteCond %{REQUEST_URI} !^/(wp-admin|wp-content/cache)/.*
  RewriteCond %{HTTP_COOKIE} !(wp-postpass|wordpress_logged_in|comment_author)_
  RewriteCond /var/www/html/wordpress/wp-content/cache/cachify/%{ENV:CACHIFY_HOST}%{ENV:CACHIFY_DIR}index.html%{ENV:CACHIFY_SUFFIX} -f
  RewriteRule ^(.*) /wordpress/wp-content/cache/cachify/%{ENV:CACHIFY_HOST}%{ENV:CACHIFY_DIR}index.html%{ENV:CACHIFY_SUFFIX} [L]
</IfModule>
# END CACHIFYCode language: Apache (apache)
Notes about .htaccess customizations
- Within the .htaccess, the above extension has a higher priority and must be placed above the WordPress Rewrite rules (marked mostly by # BEGIN WordPress … # END WordPress).
- If the website is only accessible via SSL/TLS, you have to edit
/wp-content/cache/cachify/%{HTTP_HOST}%{REQUEST_URI}index.htmlto /wp-content/cache/cachify/https-%{HTTP_HOST}%{REQUEST_URI}index.html - Some (few) hosters (like domainFACTORY and 1und1) do not provide the Apache variable %{DOCUMENT_ROOT}. This results in an incomplete file path. In such cases, please manually prepend the document path (instead of a variable), see instructions DOCUMENT_ROOT in .htaccess with server path replace (in German).
- Changes to the .htaccess file can not be made if PHP is run as fcgi.
- If there are partial errors in the redirects within the blog, the shutdown of the Apache Content Cache can help.
<IfModule mod_cache.c>
  CacheDisable /
</IfModule>Code language: HTML, XML (xml)- If the WPTouch plugin (or another mobile plugin) is installed in WordPress, RewriteRules must be extended.
nginx configuration file extension:
## GZIP
gzip_static on;

## CHARSET
charset utf-8;

## INDEX LOCATION
location / {
  if ( $query_string ) {
    return 405;
  }
  if ( $http_accept !~* "text/html" ) {
    return 405;
  }
  if ( $request_method = POST ) {
    return 405;
  }
  if ( $request_uri ~ /wp-admin/ ) {
    return 405;
  }
  if ( $http_cookie ~ (wp-postpass|wordpress_logged_in|comment_author)_ ) {
    return 405;
  }

  error_page 405 = @nocache;

  try_files /wp-content/cache/cachify/https-${host}${uri}index.html /wp-content/cache/cachify/${host}${uri}index.html @nocache;
}

## NOCACHE LOCATION
location @nocache {
  try_files $uri $uri/ /index.php?$args;
}
Code language: Nginx (nginx)
Notes about Nginx customizations
- For domains with FQDN, the variable ${http_host} must be used instead of ${host}.
General information about Cachify HDD
- The HDD caching in Cachify can only be selected and used with activated WordPress permalinks. A slash at the end of the permalink is also needed. For permalinks without slash at the end, the use of a special .htaccess snippets is required. The snippet code replaces the provided .htaccess entry above.
- If the blog is located in a sub-directory and the associated .htaccess is outside the blog directory, the path to the cache folder needs to be adjusted.
- Due to technical reasons, this caching method can not automatically respect the plugin setting No cache generation by logged in users. If you want to display the cached version of the blog pages to logged in and commenting users in WordPress, the two lines with the cookie query (RewriteCond %{HTTP_COOKIE}) must be excluded (# in front of it) in the code above. The option No cache generation by logged in users must remain activated.
- The adjusted cache expiration can not be considered. If the cache stock has to be emptied at certain time intervals, then it is recommended to call a prepared PHP file by a cronjob.
- Due to the fact that Cachify HDD does not use PHP and the WordPress execution is bypassed, no sheduled WordPress posts can be executed with this method. A useful alternative would be to hit the WordPress file wp-cron.php (to be located in the main directory of the WordPress instance) by using a server cronjob (ask host) or a service provider like cronjob.de.
Memcached (Nginx only)
Cachify provides another caching method in conjunction with the Web server: Memcached. After selecting the plugin option (if available) and the customization of the Nginx configuration file, the technology shines with its outstanding speed because the cache is stored in the RAM of the server by the plugin and delivered directly to the browser by the web server (Nginx).
A cache delivery cann’t be faster and more straightforward. Perfect teamwork between web server and memcached.
Extension of the nginx configuration file
## GZIP
gzip_static on;

## CHARSET
charset utf-8;

## INDEX LOCATION
location / {
  error_page 404 405 = @nocache;

  if ( $query_string ) {
    return 405;
  }
  if ( $http_accept !~* "text/html" ) {
    return 405;
  }
  if ( $request_method = POST ) {
    return 405;
  }
  if ( $request_uri ~ "/wp-" ) {
    return 405;
  }
  if ( $http_cookie ~ (wp-postpass|wordpress_logged_in|comment_author)_ ) {
    return 405;
  }

  default_type text/html;
  add_header X-Powered-By Cachify;
  set $memcached_key $host$uri;
  memcached_pass localhost:11211;
}

## NOCACHE LOCATION
location @nocache {
  try_files $uri $uri/ /index.php?$args;
}Code language: Nginx (nginx)
Notes about Nginx customizations
- For domains with FQDN, the variable ${http_host} must be used instead of ${host}.
- If you have errors please try to change
memcached_pass localhost:11211;tomemcached_pass 127.0.0.1:11211;This forces IPv4 because some servers that allow ipv4 and ipv6 are configured to bind memcached to ipv4 only.
Why only for Nginx?
- Apache does not provide a direct link to Memcached – in order to
access and output caching data a detour via a PHP file would have to be
done (analog to Cachify APC). Deficit: The PHP interpreter is started and demands time-intensive execution time. - The execution time also slows down in addition because the read-out
memcached data would have to be compressed in GZIP from the PHP script
if the compression on the server level is turned off. - Memcached (not Memcache) is installed on barely an
Apache web server. Even large hosters do not offer the module because
reliable and user-separated memory management can not be ensured.
After numerous tests and analyzes it is clear that the storage of the web pages in Memcache in connection with an Apache web server doesn’t lead to an expected performance gain – Cachify HDD as a caching type is much more efficient in this case.
It looks quite different on web servers with Nginx: Nginx is able to access the memcached inventory and deliver it in compressed form. Without intermediate steps and in expected performance. The Nginx module HttpMemcachedModule is always a part of a web server installation (Nginx).
Why not memcache?
The binary implementation of memcache is extremely poor so data can not be stored reliably.
APC (Alternative PHP Cache) – removed in 2.4.0
If APC (3.1.4 or greater) is installed as PHP extension on the server, a corresponding option is available within the plugin settings. After activation, Cachify stores the generated HTML of the called blog pages in the cache of the PHP extension (shared memory) and requires no database queries or dynamic PHP commands when requesting the blog pages. The response and return time of the server is above average when retrieving the blog pages from the APC cache.
To access the APC buffer Cachify provides a mediation file – under plugins/cachify/apc/proxy.php. This so-called proxy file analyzes the cache supply for the existence of the currently called web page, reads the content in the case of success and sends it directly to the browser.
Cachify stores the output files in GZIP compressed form so that no processes are required for additional GZIP compression and DEFLATE operations on the web server. The caching plugin takes the compression and the correct output to the server. Processor and memory-saving.
The integration of the proxy file differs according to the web server. Basically it is a auto_prepend_file call for PHP files which depending on the host and the given privileges is integrated in .htaccess or php.ini.
.htaccess example (Apache)
<Files index.php>
    php_value auto_prepend_file /absolute path to/plugins/cachify/apc/proxy.php
</Files>Code language: Apache (apache)
Example for nginx instances
location ~ .php {
  include fastcgi_params;
  fastcgi_pass 127.0.0.1:9000;
  fastcgi_param PHP_VALUE auto_prepend_file=/absolute path to/plugins/cachify/apc/proxy.php;

  location ~ /wp-admin/ {
    include fastcgi_params;
    fastcgi_pass 127.0.0.1:9000;
    fastcgi_param PHP_VALUE auto_prepend_file=;
  }
}Code language: Nginx (nginx)
The file integration of this kind bypasses the time-consuming execution of the not quite “light” WordPress cores and saves all database accesses. Positive side effect: The WordPress source code remains unchanged and remains upgradable.
Settings
Settings are adjustable on the plugin option page according to your wishes and circumstances. After saving the options, the site cache clears and the settings will take effect. Individual plugin options are explained below.
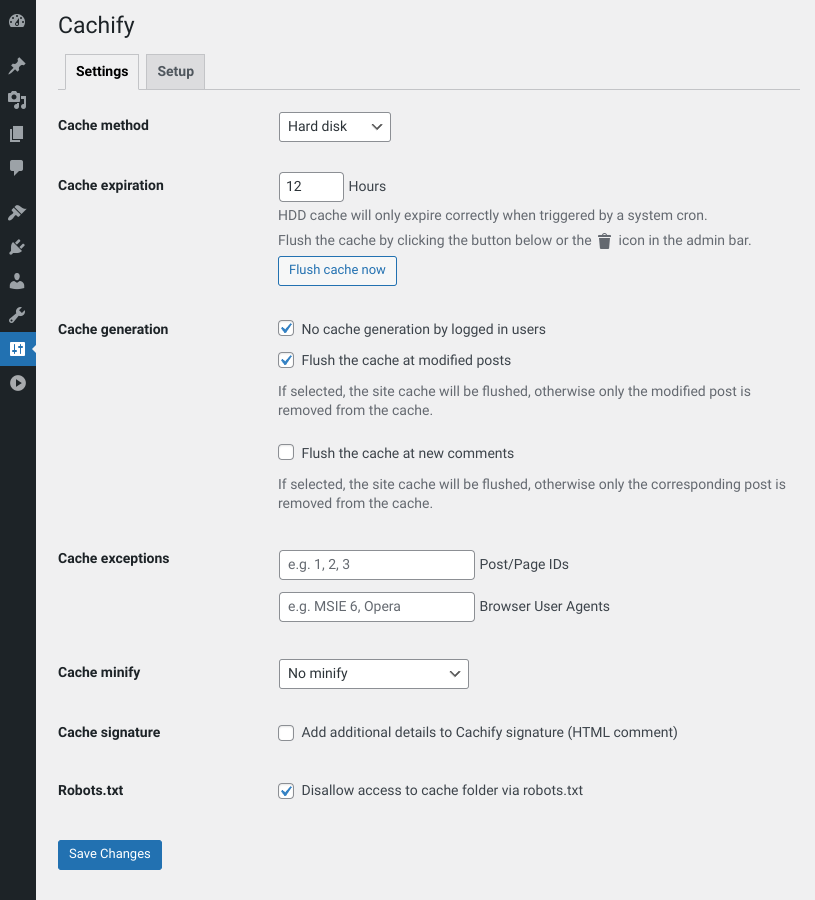
Cache method
There are 4 methods for caching the content available. It should be noted that in the case of APC, Memcached and Hard disk, various adaptations to server configuration files are necessary (see here).
- Database is always available.
- APC only with installed Alternative PHP Cache from version 3.1.4.
- Memcached when Memcached is active on Nginx.
- Hard disk as a caching type can only be used with activated WordPress permalinks.
Cache expiration
The duration of the content in the cache in hours. How it works: If the lifetime of a web page in the cache reaches the time set, this entry is removed from the cache and replaced with more recent content. For CMS websites a number in the monthly range could be worthwhile. A 0 (zero) means a time unlimited cache. If you use Hard disk as a caching type, this option cann’t be considered because of technical reasons.
Cache generation
No cache generation by logged in users
When activated, the checkbox ensures that all blog readers except logged in and already commented users are allowed to initialize the cache and get displayed the cached version of a blog page. Practically, for example if registered blog authors and administrators get displayed the integrated admin bar or edit links in the theme, which should certainly not be part of the cached page.
Unchecked option means that logged in and commenting users will see identical output of the websites as ordinary visitors (so it will not differ and all look the same). Otherwise, registered and commenting users are not allowed to create or get delivered a cached variant of the page.
If you use APC, Memcached or Hard disk as a caching method, the server system file (.htaccess etc.) must be additionally adapted to this option, see here.
Flush the cache at modified posts
With this option activated the entire site cache will be flushed if a post was modified. Otherwise only the modified post itself will be removed from the cache.
The option can be helpful if menus are updated, automatic linking is used or other pages or posts are affected by changes for whatever reason.
The option has been introduced in Cachify 2.3 as replacement for the per-post option next to the classic editor.
Flush the cache at new comments
The activated option will reset the entire cache stock at new comments. Can be useful to keep the dynamic output of the comment count per post on blog pages such as the homepage, archive pages, etc. up-to-date.
This feature is recommended only on smaller projects, where there is rare comment, since otherwise the Cachify cache would have to be rebuilt too often.
Cache exceptions
Post/Page-IDs
A comma separated list of post and/or page IDs that should be excluded from caching.
Example: 1, 2, 3
Additionally the filter hook cachify_skip_cache can be used to further tweak the behavior.
CBrowser User-Agents
Comma-separated list of the User Agents (if you want you can only specify the main part of the string) that should be excluded from the cache.
Example: MSIE 6, Opera
This option can be helpful if different outputs are generated for certain (e.g. older) browsers that are not representative for the majority of visitors.
Cache minify
Minification of the browser output. Any unnecessary characters such as line breaks and comments are removed from the generated HTML code before storing them in the cache.
If the output of the blog page is negatively affected (e.g. missing content parts or broken layout), the option should either deactivated or restricted to HTML only.
Using the filter hook cachify_minify_ignore_tags certain HTML tags can be excluded from minification.
Cache Signature
Since Cachify 2.3 the output of the signature in form of an HTML comment in the end of the cached markup can be extended.
Per default only a short information including the timestamp of generation will be appended:
<!DOCTYPE html> <html lang="en-US"> <!-- ... --> </html>

<!-- Cachify | http://cachify.de
Generated @ 02.02.2020 10:11:12 -->Code language: HTML, XML (xml)
The extended output contains additional data about the caching method used:
<!DOCTYPE html> <html lang="en-US"> <!-- ... --> </html>

<!-- Cachify | http://cachify.de
DB Cache @ 02.02.2020 10:11:12
Without Cachify: 19 DB queries, 0.55 seconds, 5.67 MB
With Cachify: 12 DB queries, 0.11 seconds, 3,45 MB
-->Code language: HTML, XML (xml)
Advanced Usage
Control of cache empties for article updates

The necessary cache drain can be manually controlled when updating articles. Authors can decide whether the entire Cachify cache or only the cache for the affected page should be removed after the article change has been saved – practically if the change made modifications only for one page and has no (optical) effect on the orher pages.
Cachify cache status when updating articles
Available options in the selection box:
Remove Total cache – Empties the entire Cachify cache
Remove Page cache – Removes only the cache of the article
The selection is only available for already published articles, pages and posttypes. The last selected option is stored user-dependent and preselected the next time the article edit page is accessed.
Worth knowing
Some additional information of the caching plugin.

Cachify cache size on the Dashboard
Browser cache usage
If desired, the HTML output of the blog pages can also be stored in the browser’s cache – for an userdefinied period of time. This technique is suitable if a project has little dynamics (no comments, rare articles, etc.). In such cases, the browser has a local copy of a blog page that expires after a defined time.
For example: For an one-hour browser cache the .htaccess or Nginx server file must be completed as shown in the figure:
Browser cache in .htaccess (Apache)
<IfModule mod_expires.c>
    <FilesMatch ".(html|html.gz)$">
        ExpiresActive On
        ExpiresDefault "access plus 1 hour"
    </FilesMatch>
</IfModule>Code language: Apache (apache)
Browser cache with Nginx (placed between error_page and try_files)
expires 1h;Code language: Nginx (nginx)Adjusting the robots.txt
To ensure that Google and other search engines don’t index the static contents of the cache folder (otherwise duplicate content), the robots.txt file in the main directory of a WordPress installation should be expanded by disallow the path to the cache file. A robots.txt could be like this:
User-agent: *
Disallow: /wp-content/cache/cachify/
Allow: /Code language: Apache (apache)
Flushing cache from third-party applications
If the Cachify cache should be emptied from WordPress third-party applications, executable actions are available within the plugin (Cachify 2.0.3 or higher):
if ( has_action('cachify_flush_cache') ) {
    do_action('cachify_flush_cache');
}

if ( has_action('cachify_remove_post_cache') ) {
    do_action('cachify_remove_post_cache', 123); // postID
}Code language: PHP (php)
Hooks
Hooks allow to the user to extend the functional extent of a WordPress-Plugins. The following Hooks are deposited in Cachify and can be addressed or controlled via code.
cachify_skip_cache
Type: Filter (Boolean)
Implementation: Cachify 2.1.1
Adjust the list of pages that should be excluded from caching.
A return value true indicates that cache generation for the current request should be skipped. For false the generation will continue.
Internal exclusion list remains untouched.
Code examples:
Exclude category “example” from caching
add_filter(
    'cachify_skip_cache',
    function( $previous_result ) {
    	return (
    	    in_category('example') ? true : false
    	);
    }
);Code language: PHP (php)
Exclude front page from caching
add_filter(
    'cachify_skip_cache',
    function() {
    	return is_home();
    }
);Code language: PHP (php)
cachify_minify_ignore_tags
Type: Filter (Array)
Implementation: Cachify 2.0.9
Adjust the list of HTML tags that should be ignored during minification of the browser output. Per default these are preformatted blocks <pre> und text areas <textarea>.
Code example:
add_filter(
    'cachify_minify_ignore_tags',
    function( $ignored_tags ) {
        /*
         * Default value:
         * $ignore_tags = array(
         *   'textarea',
         *   'pre',
         * );
         */
        $ignored_tags[] = 'custom-tag';

        return $ignored_tags;
    }
);Code language: PHP (php)
cachify_user_can_flush_cache
Type: Filter (Boolean)
Implementation: Cachify 1.2
This hook allows adjustment of users who are allowed to flush the cache.
Per default this is only allowed for administrators with the manage_options capability. A return value true allows the current user to use this function.
Code example:
add_filter( 'cachify_user_can_flush_cache', '__return_true' );Code language: PHP (php)cachify_store_item
Type: Filter (Boolean)
Implementation: Cachify 2.3
Last filter before data is saved.
This hook takes up to 5 parameters:
bool $should_cache– Should the current request be cached? (default:true)string $data– The pre-processed data for caching.object $method– Instance of the caching backend used.string $cache_hash– Hash (cache key) of the current request.int $cache_expires– Validity of the cache entry in seconds.
There are 2 possible return values:
true– The current element should be stored (default)false– The current entry should not be stored.
Code example:
add_filter(
    'cachify_minify_ignore_tags',
    function( $should_cache, $data, $method, $cache_hash, $cache_expires ) {
        // No cache for markup up to 1000 characters.
        return strlen( $data ) > 1000;
    },
    10,
    5
);Code language: PHP (php)
cachify_flush_cache_hooks
Type: Filter (Array)
Implementation: Cachify 2.3
Adjustment of the action hooks that trigger flushing the total cacle.
This hook takes an associative array of all hooks with name of the hook as key and priority as value.
Code example:
add_filter(
    'flush_cache_hooks',
    function( $hooks ) {
        /*
         * $hooks = array(
         *   'cachify_flush_cache'            => 10,
         *   '_core_updated_successfully'     => 10,
         *   'switch_theme'                   => 10,
         *   'before_delete_post'             => 10,
         *   'wp_trash_post'                  => 10,
         *   'create_term'                    => 10,
         *   'delete_term'                    => 10,
         *   'edit_terms'                     => 10,
         *   'user_register'                  => 10,
         *   'edit_user_profile_update'       => 10,
         *   'delete_user'                    => 10,
         *   'autoptimize_action_cachepurged' => 10,
         * );
         */
         $hooks[] = 'my_custom_action';

         return $hooks;
    },
    5,
    10
);Code language: PHP (php)
cachify_flush_cache
Type: Action
Implementation: Cachify 2.0.3
This hook allows flushing the total cache through third party application, e.g. another plugin.
Code example:
 if ( has_action( 'cachify_flush_cache' ) ) {
     do_action( 'cachify_flush_cache' );
 }Code language: PHP (php)
cachify_remove_post_cache
Type: Action
Implementation: Cachify 2.0.3
This hook allows removal of a single post form the cache. The corresponding post ID must be passed as parameter.
Code example:
if ( has_action( 'cachify_remove_post_cache' ) ) {
    do_action( 'cachify_remove_post_cache', 123 );
}Code language: PHP (php)
cachify_modify_output
Type: Filter (String)
Implementation: Cachify 2.4.0
This hook allows modification of the data before the cache is stored. Parameters are the actual data (markup), current caching method name, hash value of the element and validity period in seconds.
Code example:
add_filter(
    'cachify_modify_output',
    function( $data, $method, $hash, $cache_expires ) {
        return $data . '<!-- additional comment line  -->';
    },
    10,
    4
);Code language: PHP (php)
cachify_create_gzip_files (HDD cache only)
Type: Filter (Boolean)
Implementation: Cachify 2.4.0
Using this filter you can disable generation of pre-compressed .gzip files using HDD cache.
Code example:
add_filter(
    'cachify_create_gzip_files',
    function( $enabled ) {
        return false;
    }
);Code language: PHP (php)
cachify_removed_cache_by_url
Type: Action
Implementation: Cachify 2.4.0
This action is triggered after a single page has been removed from the cache. The removed entry can be identified by URL or hash.
Code example:
add_action(
    'cachify_removed_cache_by_url',
    function( $url, $hash ) {
        // ... do something ...
    },
    10,
    2
);Code language: PHP (php)
cachify_flushed_total_cache
Type: Action
Implementation: Cachify 2.4.0
This action is triggered after the entire cache has been flushed. An optional boolean parameter is passed indicating whether all methods have been flushed or just he currently active.
Code example:
add_action(
    'cachify_flushed_total_cache',
    function( $clear_all_methods ) {
        // ... do something ...
    }
);Code language: PHP (php)
Frequently asked questions
Didn’t the online documentation answer all questions yet? Maybe the following answers to frequently asked questions do help.
No cache expiration option while using HDD cache?
The cache expiration can not be considered due to technical reasons. If the cache stock has to be emptied at certain time intervals, then it is recommended to call a prepared PHP file by a cronjob.
PHP Fatal error: Cannot use output buffering in output buffering display handlers in Unknown on line 0
This error message may occur after commissioning the caching plug-in. The hint appears because there are no cache files on the HDD for output. This is probably due to the fact that Cachify could not store files in the cache folder. Please check the write-permissions for the cache folder (found in the WordPress directory wp-content) and set them if necessary.
My Website looks in some parts broken after activating Cachify!
Please make sure there is no issue that caused by the Cache minify feature. Just deactivate it or use HTML only. If the issue still exist please feel free to report it at the support forums. With this feature any unnecessary characters such as breaks and HTML comments are removed from the source code.
Cachify HDD: Character encoding does not work correctly
If you use Cachify to store the cache on HDD there is no PHP to run. In the case of misconfigured servers, this can lead to incorrect display of the special characters on web pages. The error can be corrected by an extension of the system file .htaccess: AddDefaultCharset UTF-8
Cachify with CDN support?
Currently the caching plugin for WordPress has no connection to a CDN provider. Although the Buzzword CDN (Content Delivery Network) is praised as a performance factor, CDN makes little sense for WordPress websites with a national audience. In this case, a home host could provide the requested files faster than a worldwide CDN service provider because the next node could be far away.
PHP OPcache as a caching method?
Compared to APC (Alternative PHP Cache), PHP OPCache is not able to contain content with custom keys and values. Because of this Cachify can not consider the PHP OPCache as a caching method.
When does Cachify automaticaly flush its cache?
- After publishing new posts
- After publishing new pages
- After publishing new custom post types
- After publishing new sheduled posts (only Cachify DB)
- After updating WordPress
- If you confirm the trash button on the adminbar
- After saving Cachify settings
Which parts of the website are not cached by default?
- Password protected pages
- Feeds
- Trackbacks
- Robots
- Previews
- Mobile-themes (WP-Touch, Carrington, Jetpack Mobile)
- Search
- Error pages
- Sitemaps
The cache folder is indexed by search engines!
To ensure that Google and other search engines do not index the static contents of the cache folder (otherwise there could be duplicate content), the robots.txt file which is located in the main directory of a WordPress installation should be expanded by disabling the path to the cache file (disallow ). This issue should only happen if you use a static robots.txt or you changed the wp-content location. And so might look a robots.txt:
User-agent: *
Disallow: /wp-content/cache/cachify/
Allow: /Code language: Apache (apache)